Every day millions of people uses different VPN service providers to protect their online privacy. But it not all VPN providers are as anonymous or as secured or dedicated to protecting your Online privacy as they claim to be.  Some VPN service providers even log your activity and if you are living in a country where certain sites are not allowed or you might get prosecuted for doing something as simple as scanning a network (yes, it’s in-fact an offense in many First World countries). I wrote this article on fixing VPN grayed out problem in Kali Linux. Many readers asked me to write a complete guide on how to set up VPN and which ones are secured.
 Some VPN service providers even log your activity and if you are living in a country where certain sites are not allowed or you might get prosecuted for doing something as simple as scanning a network (yes, it’s in-fact an offense in many First World countries). I wrote this article on fixing VPN grayed out problem in Kali Linux. Many readers asked me to write a complete guide on how to set up VPN and which ones are secured.
Fact is, I simply cannot test all VPN providers. I cannot vouch for other users experiences and I usually only write stuffs I am sure about. Of many VPN providers, PrivateInternetAccessis claimed to be the best and fastest and according to their ToS and Privacy Policy, they seems to be well praised and recommended by several reviews such as done by TorrentFreak and LifeHacker. I strongly suggest readers to do some research before committing to any providers.
Following eight questions were taken from TF website and I feel that you should be asking yourself the same questions before going for any VPN providers: (I’ve added some comments below, your opinion might be different).
- Do you keep ANY logs which would allow you to match an IP-address and a time stamp to a user of your service? If so, exactly what information do you hold and for how long?
- No logs.
- Under what jurisdictions does your company operate and under what exact circumstances will you share the information you hold with a 3rd party?
- Out of US, GB or any NATO affiliated countries if possible. But then you compromise on speed. Alternatively suspend user account instead of handing over logs or data.
- What tools are used to monitor and mitigate abuse of your service?
- Other than abuse blocking and service uptime, no monitor at all.
- In the event you receive a DMCA takedown notice or European equivalent, how are these handled?
- Suspend user account instead of handing over logs or data.
- What steps are taken when a valid court order requires your company to identify an active user of your service?
- Suspend user account instead of handing over logs or data.
- Is BitTorrent and other file-sharing traffic allowed on all servers? If not, why?
- I never cared for BT, but I guess no discrimination on any type of traffic.
- Which payment systems do you use and how are these linked to individual user accounts?
- Anything and everything. Best would be BitCoin. Setup own BTminer and pay with that. In that way, little/no online trace whatever.
- What is the most secure VPN connection and encryption algorithm you would recommend to your users?
- AES-128, RSA2048 or higher supported. Don’t use SHA1.
As I mostly use Kali Linux, my primary concentration would be on that. However, Kali Linux and Ubuntu uses same Network Manager, so this guide applies to the any Debian variant such as Kali Linux, and Ubuntu variants such as Linux Mint etc. In short, if you follow this guide, you will be able to setup VPN on Kali Linux, Ubuntu, Debian Linux Mint etc.
Setup VPN on Kali Linux
I use Kali Linux despite many of it’s flaw and shortcomings and I have became used to it. If you’re seriously about Online privacy, stick with the distro you know and understand best. Kali is just another Linux distro and it is as secured as you make it. There are many ways you can do it. VPN to Tor to VPN via anon proxy.
Why use VPN – benefits?
Here’s my top 11 reasons why you would want to use VPN services.
- VPN provides Privacy and cloaks your IP address.
- Use any network (public or private or free WiFi) with encryption
- Login to your home or Work network from anywhere with confidence.
- Bypass censorship and content monitoring.
- Browse and bypass Firewall and censorship policy at work or Anywhere!
- Access region restricted services from anywhere (i.e. Youtube videos, NetFlix or BBC Player etc.)
- Transfer or receive files with privacy.
- Hide your voice/VOIP calls.
- Use Search Engines while hiding some of your identity.
- Hide yourself
- Cause you like to be anonymous.
As you can see from the list above, VPN not necessarily hides everything. Search engines can probably still recognizes you based on your cookies, previous browsing behavior, account sign-in (duh!), browser plug-ins (i.e. Alexa, Google Toolbar etc.).
Step 1: Enabling VPN on Kali Linux
By default the VPN section is grayed out on Kali Linux. You can follow my guide on fixing VPN grayed out issue (with screengrabs) or just copy paste the commands from below:
There’s two variants on the commands I’ve used, the first one enables all sorts of VPN and PPTP mumbo-junbo’s so that you don’t have to work your way through it later.
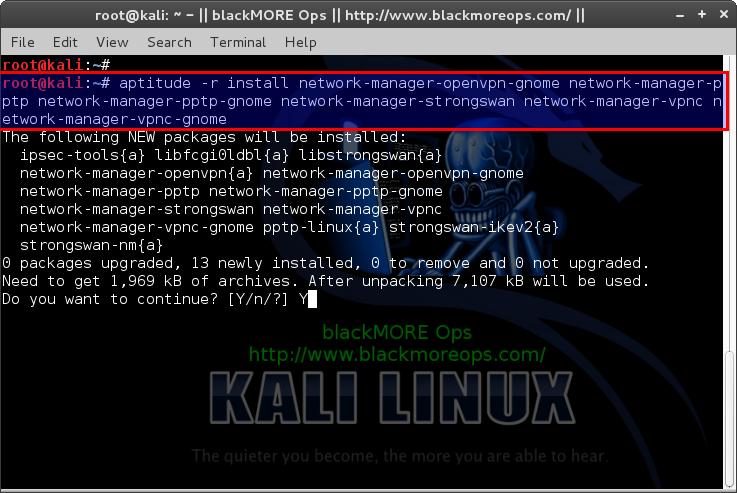
The second one is more specific to VPN and just enabling VPN
On some cases, you might have to restart network-manager and networking,
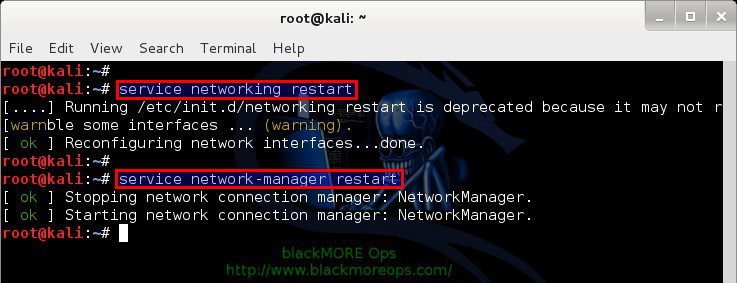
Once done, it will fix your VPN grayed out issues. For other Linux distro, this isn’t so much of a problem as those packages are usually pre-installed. (which I find a waste as your distro becomes bulkier).
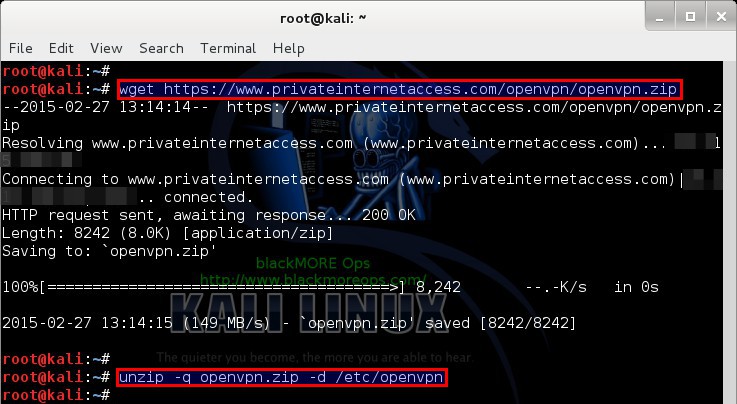
Step 2: Download and extract openvpn certs from PIA
Download and extract the openvpn.zip file containing ca.crt in the correct directory:
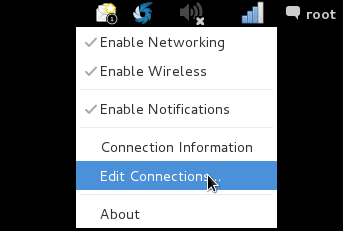
Step 3: Configure Network Manager to use PIA VPN
Go to Network Manager > Edit Connections
Change to VPN Tab. VPN> Add
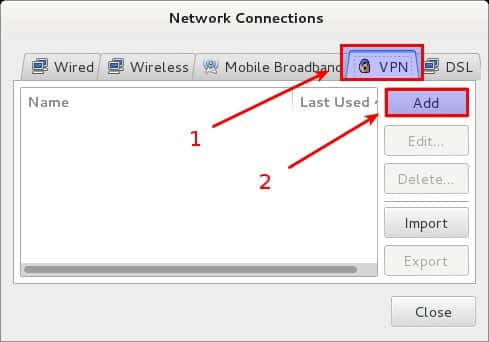
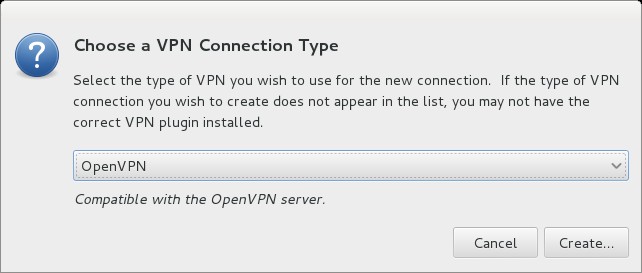
Click [ADD +] click the drop down menu, and set the type as OpenVPN.
Click [Create]
Click [Create]
Go to “VPN” and fill up the following details”.
- Connection name:
- Gateway:
- Username:
- Password:
- CA Certificate: Browse to and select
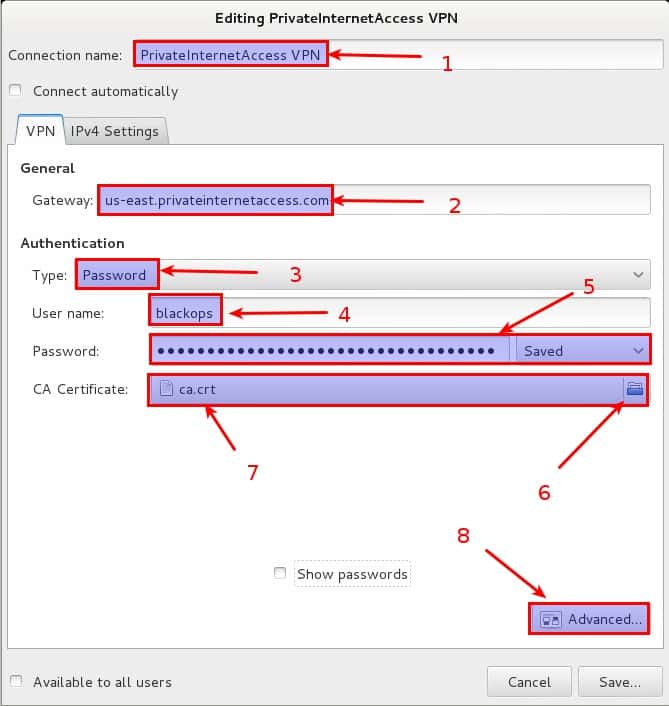
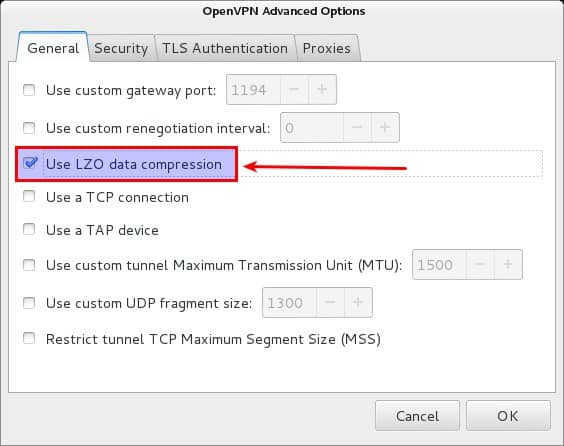
- Click [Advanced]: Check the box next to “Use LZO data compression“
- Click [OK], [Save] and then [Close].
As for Gateways, choose on the following depending on your location:
PIA Regional Gateways
- United States (US VPN)
us-midwest.privateinternetaccess.com
us-east.privateinternetaccess.com
us-west.privateinternetaccess.com
us-texas.privateinternetaccess.com
us-california.privateinternetaccess.com
us-florida.privateinternetaccess.com
- Canada (CA VPN)
ca.privateinternetaccess.com
ca-toronto.privateinternetaccess.com
- United Kingdom (UK VPN)
uk-london.privateinternetaccess.com
uk-southampton.privateinternetaccess.com
- Switzerland (Swiss VPN)
swiss.privateinternetaccess.com
- Netherlands (NL VPN)
nl.privateinternetaccess.com
- Sweden (SE VPN)
sweden.privateinternetaccess.com
- France (FR VPN)
france.privateinternetaccess.com
- Germany (DE VPN)
germany.privateinternetaccess.com
- Romania (RO VPN)
ro.privateinternetaccess.com
- Hong Kong (HK VPN)
hk.privateinternetaccess.com
- Israel (Israel VPN)
israel.privateinternetaccess.com
- Australia (Australia VPN)
aus.privateinternetaccess.com
- Japan (Japan VPN)
japan.privateinternetaccess.com
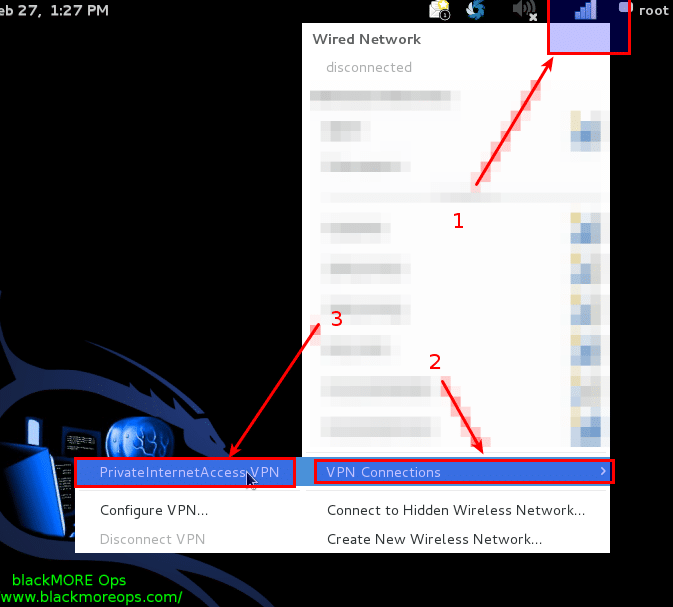
Step 4: Connect to PIA VPN
Click Network Manager > VPN Connections > PrivateInternetAccess VPN
You will see a yellowish colored connection indicator while connecting.
Setting up VPN on Ubuntu
Ubuntu parts were taken from PIA support site. This also covers Linux Mint or any Ubuntu variants.
This is almost as easy as it gets. There’s 3 variations you can try to connect to PIA
- Use PIA script for Ubuntu 12.04 or higher
- Setup manually via Network Manager for Ubuntu 12.04 or higher
- Setup manually via Network Manager for Ubuntu 10.10
Ubuntu 1 : Ubuntu Linux 12.04: OpenVPN Installer
- Download the openvpn ubuntu installer
- Run sudo sh ~/Downloads/install_ubuntu.sh (replace path to installer accordingly)
- Type ‘y’ to install python 2.7 in case it’s not installed.
- Type ‘y’ to install network-manager-openvpn in case it’s not installed.
- Enter the login for your account.
- Wait for the installation to finish.
- Connect using the Network Manager.
- Enter your password when prompted (only needs to be done once per region).
Ubuntu 2: Ubuntu Linux 12.04: OpenVPN via Network Manager Setup
- Open a Terminal, and run: sudo apt-get install openvpn network-manager-openvpn network-manager-openvpn-gnome. This will prompt for both your password, and a Y/n answer, please provide it with your password, and Y
- Once installed, open System Settings, then Network
- Press the + symbol to add a new connection, and select the VPN Interface, then press Create
- Choose OpenVPN as your VPN Connection Type, and press Create
- The following will walk you though all configuration steps needed for the PIA VPN.
- Gateway: Select one of the Hostnames provided on the Network page
- Authentication
- Type: Password
- Username: The username provided with the PIA account
- Password: The password provided with the PIA account
- CA Certificate: Downloaded this zip file and extract the ca.crt file to somewhere it won’t be deleted. We suggest your Home folder. If you extract this to your home folder, when searching for it, please click on your username on the left side, which will take you right to the home folder, then select the ca.crt file from the options on the right.
- Advanced: Under the general tab, check the Use LZO data compression
- IPv4 Settings:
- Method: Automatic (VPN) Addresses Only
- Press Save. If you chose to have your password saved it may ask for you to verify your password to open your keyring.
Ubuntu 3: Ubuntu Linux 10.10: OpenVPN Setup
- In Terminal, install openvpn packages with sudo apt-get install network-manager-openvpn.
- Restart the network manager with sudo restart network-manager
- Run sudo wget https://www.privateinternetaccess.com/openvpn/openvpn.zip
- Extract the files from the zip with unzip openvpn.zip.
- Move ca.crt and crl.pem to /etc/openvpn
- Open the Network Manager on the menu bar.
- Choose add and select the OpenVPN connection type, and click Create.
- Enter Private Internet Access SSL for the Connection Name.
- Enter us-california.privateinternetaccess.com [*] for the Gateway
- Select Password and enter your login credentials.
- Browse and select the CA Certificat we saved in Step 3.
- Choose Advanced and enable LZO Compression.
- Apply and exit.
- Connect using the Network Manager.
Testing: Leak Test Sites
Once connected, you would like to head the following websites to confirm if you are leaking any informations
- For DNS Leak test, check here:
http://dnsleak.com/ - For Email leak test, check here:
http://emailipleak.com/ - Those who uses ipv6, check your leaks here:
http://ipv6leak.com/
Conclusion
VPN is good, VPN is secure, VPN allows you to bypass proxies, Firewall, monitoring and content filtering. But there’s always that drama when you’re using VPN, it sometime is slow and sometime is not that secure you’d think. But for countries like Iran, Pakistan, Egypt, China, North Korea etc. where content filtering is done in National Level maybe it’s a way to get the voice out. I am not going to discuss legality here, so I will leave that to you.
I have great experience on Kali Linux as I, used FastestVPN for better security and easy configuration.
ReplyDeleteFastestVPN offers Best VPN for Linux with an easy setup that lets you experience the internet with freedom, anonymity, security and privacy!